The Dutch Oven was invented over 300 years ago in the year 1710. And since then, very little has changed about it. Why, because it is one of the few inventions that from its original design, was near to perfect. It has to be the most versatile piece of camp cookware there is. Just about anything you want to do, you can do with a Dutch Oven. Want to make a stew? No problem. Want to fry or boil? Your covered. Cook a steak? Easy. Bake a cake or even a pizza? Again, not a problem.
You don’t even need a stove to do it. You can cook in your campfire or above it on a tripod. Yes, you can use them on a camp stove but there is something about cooking over your campfire that just makes everything taste better. With that being said, cooking with a Dutch Oven can be a little intimidating at first. Why? Because most of us have spent our lives cooking over a stove. We can control the heat we use by the turn of a knob or a push of a button. Dutch cooking is much more primitive, but just as easy. Dutch cooking is basically the same, and a little a different all at the same time which makes it not only a challenge, but a lot of fun.

There are basically two types of Dutch ovens. Deep and Shallow. Deep ovens are for cooking things that have a lot of volume, like meats and stews, soups and such. Shallow ovens are more for baking. You can use either for all, you just have to keep a few things in mind. But we will get to that soon.
So, what size oven do you need? That depends on how many people you are serving. For a couple, an 8 or 10 inch should work. For a family of 4, a 12 inch should suffice. For larger groups, a 14 or 16 inch is available. Below is a basic chart.

Size————Capacity—————Servings
8 Inch————2 Qts.—————– 2-4
10 Inch ———-4 Qts.——————4-8
12 Inch———–6 Qts.—————–8 -12
14 Inch———– 8 Qts.—————–12-16
16 Inch————12 Qts.—————16 +
Now that you have identified the size you need, do you need a deep or standard model? That depends on what kind of cooking you are going to be doing. If you are primarily baking, a standard is best. If you are making soups, stews and dishes such as that, a deep model is better.
Ok, so you’ve identified the size and model that you need. The next question is how do you cook with one? Traditionally, you would build a fire and use the coals from the fire to heat the oven, but that takes a little practice to get it right. So starting off, I recommend using charcoal briquettes to get some experience using the oven using the chart below as a basic guide. Remember, build your charcoal fire and let the coals get nice and hot before placing them on top of and below your oven.
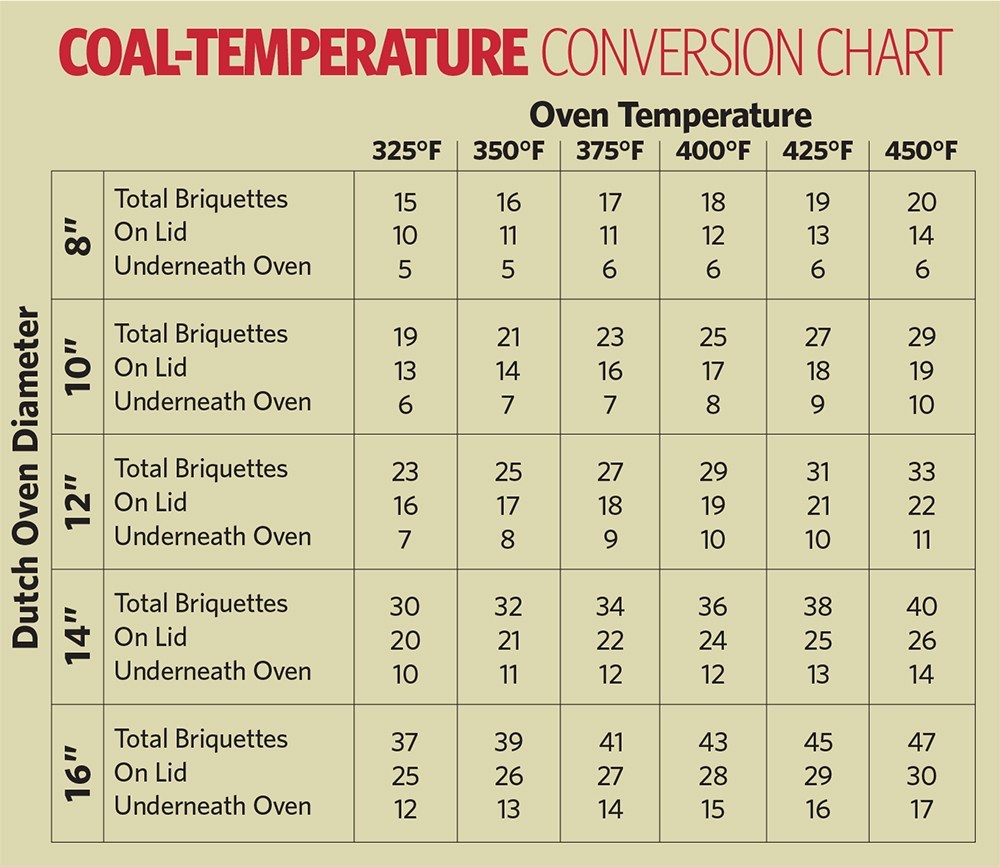
Now keep in mind, this is not an exact science. Depending upon wind, weather and environmental conditions, you may have to add a coal or two. Also, I always put a piece of aluminum foil on the ground to cook on. This keeps the oven off the ground and keeps me from losing heat below while helping to radiate heat above.
Now let me say this, I said that the deep ovens are not good for baking. They will still bake, but the problem is that browning the top of whatever your baking is a challenge. So, whenever I am baking in my deep oven which is a 14″ inch model. I change the ratio to 75% of my coals on top and 25% on bottom. This still keeps the temperature in the oven at the right level, but gives me more heat coming from the top to help with browning.
Ok, so now we have identified which model to use. We’ve built our charcoal briquette fire. We know what temperature we need and we’ve started cooking. What do we do next? Unfortunately, the Dutch Oven is not a set it and forget apparatus. Though cast iron is great to cook in, it often does not heat evenly so you have to “rotate” your oven every now and then. That means that every so often, you need to turn the entire oven about a 1/3 of a turn in one direction then turn the lid 1/3 of a turn in the opposite direction. This will ensure even heating. How often, as a rule of thumb, I rotate about every 10 minutes. When rotating the lid, try not to lift it so heat doesn’t escape. A lid lifter makes rotating easy.
Keep in mind, the longer you cook, the more you will have to replace coals and sweep away the ashes to maintain consistent heat. So, as coals burn to ash and their heat diminishes, replace them with fresh burning coals or coals from your campfire. When your food is done. Remove the Dutch oven from the coals then carefully sweep the ashes off the lid. Remove lid, serve and enjoy.
Aside from all the versatility a Dutch oven offers, you will find that food cooked in a dutch oven has a richness of flavor unlike anything else. Once you get the hang of it, It will be your go-to way to cook.
Find your headwaters,
Jaucque
